scikit-image 模板匹配+非极大值抑制实现
scikit-image 提供了一个match_template()函数,不过这个函数的定位并不是像VisionPro中的PMAlign(或者VisionMaster中的模板匹配),它不是一个端到端的工具,而是输出一个用模板滑过图像窗口形成的相关系数矩阵:即结果是一个矩阵,每个值表示在相应窗口位置时,模板与图像窗口的相关性。
这个函数的作用类似于我们手写一个人脸检测模块时,在第一阶段构建的人脸分类+滑动窗口的功能——即输出每个位置的得分,以表示每个区域是否存在人脸(或者存在人脸的概率)。但是随之而来的问题是,位置相近的窗口会有多个,但是它们都是同一个实体对象。这篇笔记组合了match_template()和NMS算法,实现一个端到端的模板匹配功能。
实现对象
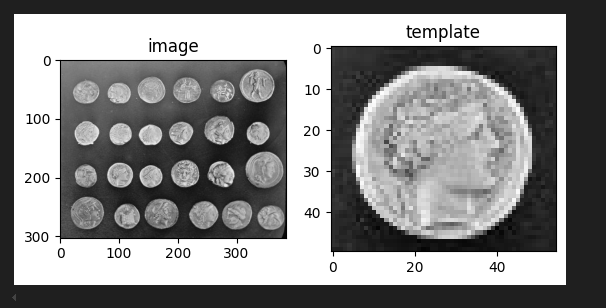
我们今天的实验对象是scikit-image官方的硬币示例:
image = data.coins()
coin = image[170:220, 75:130]

fig, ax = pyplot.subplots(1, 2)

ax0: axes.Axes = ax[0]
ax0.imshow(image, cmap='gray')
ax0.set_title("image")

ax1: axes.Axes = ax[1]
ax1.imshow(coin, cmap='gray')
ax1.set_title("template")
匹配模块+滑动窗口
直接调用匹配模板函数,可以得到各窗口得分:
scores = feature.match_template(image, coin)
print(scores.shape)
# 输出:
# (254, 330)
看起来我们只需要筛出得分大于一定阈值的结果即可。但是问题是,有很多窗口位置接近,得分也接近——这些窗口对应的实际上是同一个实体。
我们的基本想法是,采用图像对象检测中的非极大值抑制(NMS)方法,在位置相近的窗口中,选择得分最好的对象框。
我们首先筛出得分大于0.85的,整理成 \((x_1,y_1,x_2,y_2, score)\) 格式的列表:
rc = numpy.where( scores > 0.85)      # 结果是两行数组,第一行代表x,第二行代表y
print(rc)

rows = rc[0]
cols = rc[1]
candicates = zip(rows, cols)

hcoin, wcoin = coin.shape
boxes = numpy.array([ (x, y, x + wcoin, y + hcoin, scores[x, y]) for (x, y) in candicates])

print(boxes)非极大值抑制(NMS)
然后,我们需要NMS去除位置临近的对象框。虽然OpenCV和 Pytorch提供了成熟、高效的NMS实现,但是这里为了深入理解,我们选择手写一个:
def nms(boxes, iou_threshold):
    if numpy.size(boxes) == 0:
        return numpy.array([])

    # 按置信度分数降序排序
    score_idx = numpy.argsort(boxes[:, 4])
    score_idx = score_idx[::-1]
    boxes = boxes[score_idx]

    selected_boxes = []
    while numpy.size(boxes) > 0:
        best_box = boxes[0]
        selected_boxes.append(best_box)

        # 滤掉与 best_box 的 iou 过大的那些框
        boxes = boxes[1:]
        if numpy.size(boxes) == 0:
            break
        ious = compute_ious(best_box, boxes)
        boxes = boxes[ious <= iou_threshold]

    return numpy.array(selected_boxes)
IoU
上面的compute_ious(),是我们自己编写的用于计算一个对象框和一组对象框(广播)的交并比(IoU)的函数:
def compute_ious(best_box, boxes):
    x1 = numpy.maximum(best_box[0], boxes[:, 0])
    y1 = numpy.maximum(best_box[1], boxes[:, 1])
    x2 = numpy.minimum(best_box[2], boxes[:, 2])
    y2 = numpy.minimum(best_box[3], boxes[:, 3])

    # 计算【交】面积
    inter_width = numpy.maximum(0, x2 - x1 + 1)
    inter_height = numpy.maximum(0, y2 - y1 + 1)
    inter_area = inter_width * inter_height

    # 计算【并】面积
    box1_area = (best_box[2] - best_box[0] + 1) * (best_box[3] - best_box[1] + 1)
    box2_area = (boxes[:, 2] - boxes[:, 0] + 1) * (boxes[:, 3] - boxes[:, 1] + 1)
    union_area = box1_area + box2_area - inter_area

    # 避免取到0
    ious = inter_area /  numpy.maximum(union_area, 1e-6)

    return ious
之所以要自己实现,是为了验证自己是否真正理解了这里的基本原理,运行效率并不重要。
我们可以使用torchmetrics类库下提供的IntersectionOverUnion来验证我们自己编写的compute_ious()是否正确
from torchmetrics import detection
import torch

# 针对每个图片的预测框,每个`{ }` 代表一个图片的预测结果(可以有多个预测框)
preds = [
    {
        "boxes": torch.tensor(
            [
                [296.55, 93.96, 314.97, 152.79],
                [298.55, 98.96, 314.97, 151.79]
            ]),
        "labels": torch.tensor([4, 5])
    }
]

# 真实结果,每个`{ }`代表一个图片的真实预测框及类别
target =[
    {
        "boxes": torch.tensor([[300.00, 100.00, 315.00, 150.00]]),
        "labels": torch.tensor([5]),
    }
]

metric = detection.IntersectionOverUnion(class_metrics=True)
metric(preds, target)

# outputs
# {'iou': tensor(0.8614), 'iou/cl_5': tensor(0.8614)}使用我们自定义的compute_ios():
boxes =numpy.array([
    [298.55, 98.96, 314.97, 151.79]
    ])
target= numpy.array([300.00, 100.00, 315.00, 150.00])

compute_ious(target, boxes)

# array([0.86715061])有了nms()实现,我们直接调用即可:
found = nms(boxes=boxes, iou_threshold= 0.8)

print(found)
得到:
[[170.          75.         225.         125.           1.        ]
 [240.          87.         295.         137.           0.87542016]]
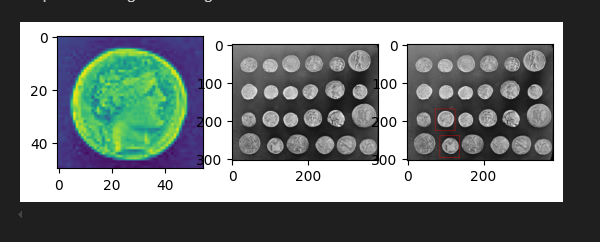
看起来好多了,绘制一下界面看下效果:
image_copy =  color.gray2rgb(image)

for m in found:
    (x1, y1, x2, y2, score) = m
    rr, cc = draw.rectangle_perimeter((x1, y1), (x2, y2), shape=image.shape)
    image_copy[rr, cc] =  (255, 0, 0)

fig, axs = pyplot.subplots(1, 2)
ax1 : axes.Axes = axs[0]
ax2 : axes.Axes = axs[1]

ax1.imshow(image, cmap='gray')
ax2.imshow(image_copy)
举一反三
match_template()的意义类似于对象分类+滑动窗口。相比于一些机器视觉提供的现成的工具模块,虽然不那么“集成化”,但是却具有很好的组合性,尤其是搭配上NMS处理,对于理解对象检测的基本原理,非常有意义。
情感表达稍显含蓄,可适当强化渲染。
每一个段落都紧密相连,逻辑清晰,展现了作者高超的写作技巧。